< Workshops
Design Slack workflows with AI integrations
Integrate your favorite genAI into your Slack workflows
Difficulty
Intermediate
Time
40 minutes
Requirements
- VsCode
- Slack CLI
- A testing workspace (get an Enterprise Grid sandbox for free by joining developer program)
- OpenAI credentials or
- Anthropic Claude credentials
Quick Jump
- Step 1: Project set up
- Step 2: Set up OpenAI or Anthropic keys
- Step 3: Prepare your Slack channel
- Step 4: Configure the event trigger
- Step 5: Let’s explore Workflows
- Step 6: API methods and code tour
- Step 7: Run the app locally and test your workflow
- Step 8: Deploy and uninstall
Build an email response generator
In large-scale customer service departments, response times are crucial. This workshop will teach you how to harness generative AI to automate customer email responses within Slack. Our goal is to improve response efficiency by leveraging AI to draft email responses and enable human review and approval before sending.
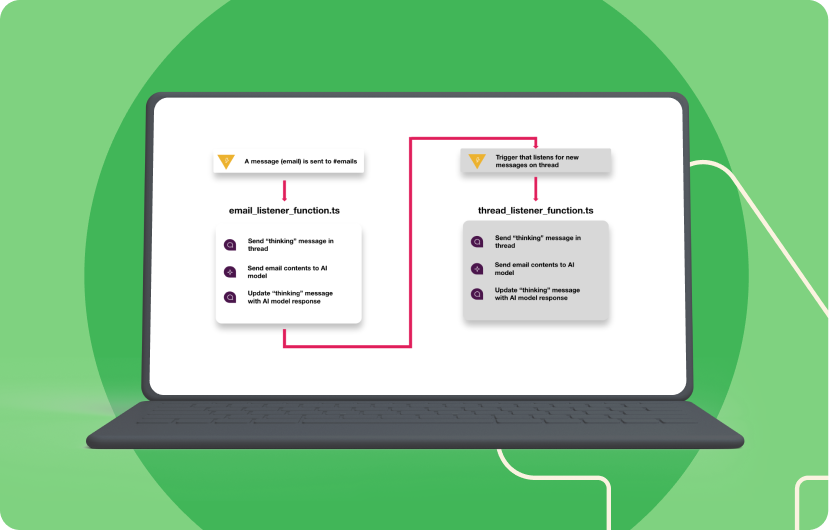
How the Workflow Operates:
- Receive Email in Slack:
Emails sent to a dedicated Slack channel trigger a workflow, automatically forwarding customer inquiries to Slack. - Notify User & Generate Response:
The workflow posts a notification to Slack, informing the user that the system is generating a response. At the same time, it sends the email’s content to the AI to create a draft response. - AI Drafts Response:
The AI generates a response and posts it back in the same Slack thread. The user can edit and finalize the response directly within Slack before sending it to the customer.
Step 1
Project set up
Before diving into code, it’s essential to understand the components at play. We are using the Slack CLI and Deno Slack SDK to create an app that listens to Slack events and reacts accordingly. The AI integration will use external API calls (e.g., OpenAI) to process customer emails and return responses.
At this point you should be familiar with the Slack CLI and how it works. If this is new for you we’d strongly recommend starting with the Building an automated workflow workshop first.
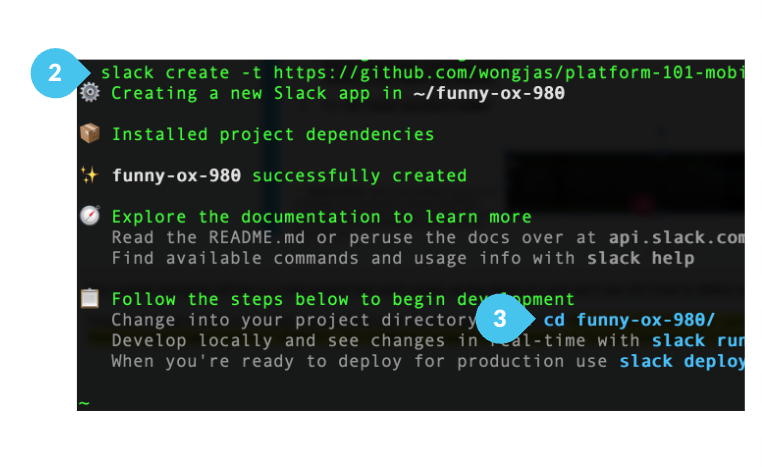
- Create a New Slack Project:
Open your terminal and navigate to a directory where you have permission to create files. Use the following command to scaffold a new Slack project:
- OpenAI example:
slack create -t https://github.com/wongjas/platform-201-email-generator - Anthropic example:
slack create -b anthropic-example -t https://github.com/wongjas/platform-201-email-generator anthropic-example
This will generate a basic project structure. Inside, you’ll find manifest.ts (where we define app permissions) and workflows, and functions (where the logic lives).
- Change to the project directory and open it in VSCode:
cd <your-project-name>
code .
Step 2
Set up OpenAI or Anthropic keys
Generative AI services (like OpenAI and Anthropic) require an API key to authenticate requests. Let’s get set up with one of these platforms.
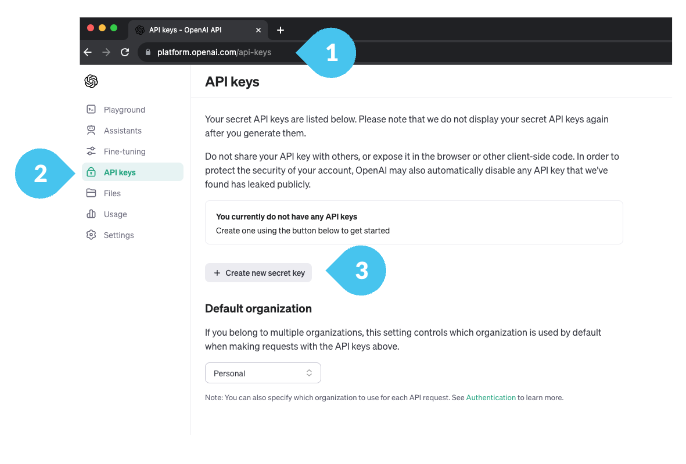
- Sign Up and Retrieve API Key:
If you haven’t already, create an account on OpenAI or Anthropic’s platform. After signing in, go to the API settings page and generate an API key.- OpenAI
- Go to https://platform.openai.com/api-keys
- API Keys
- Click on + Create new secret key
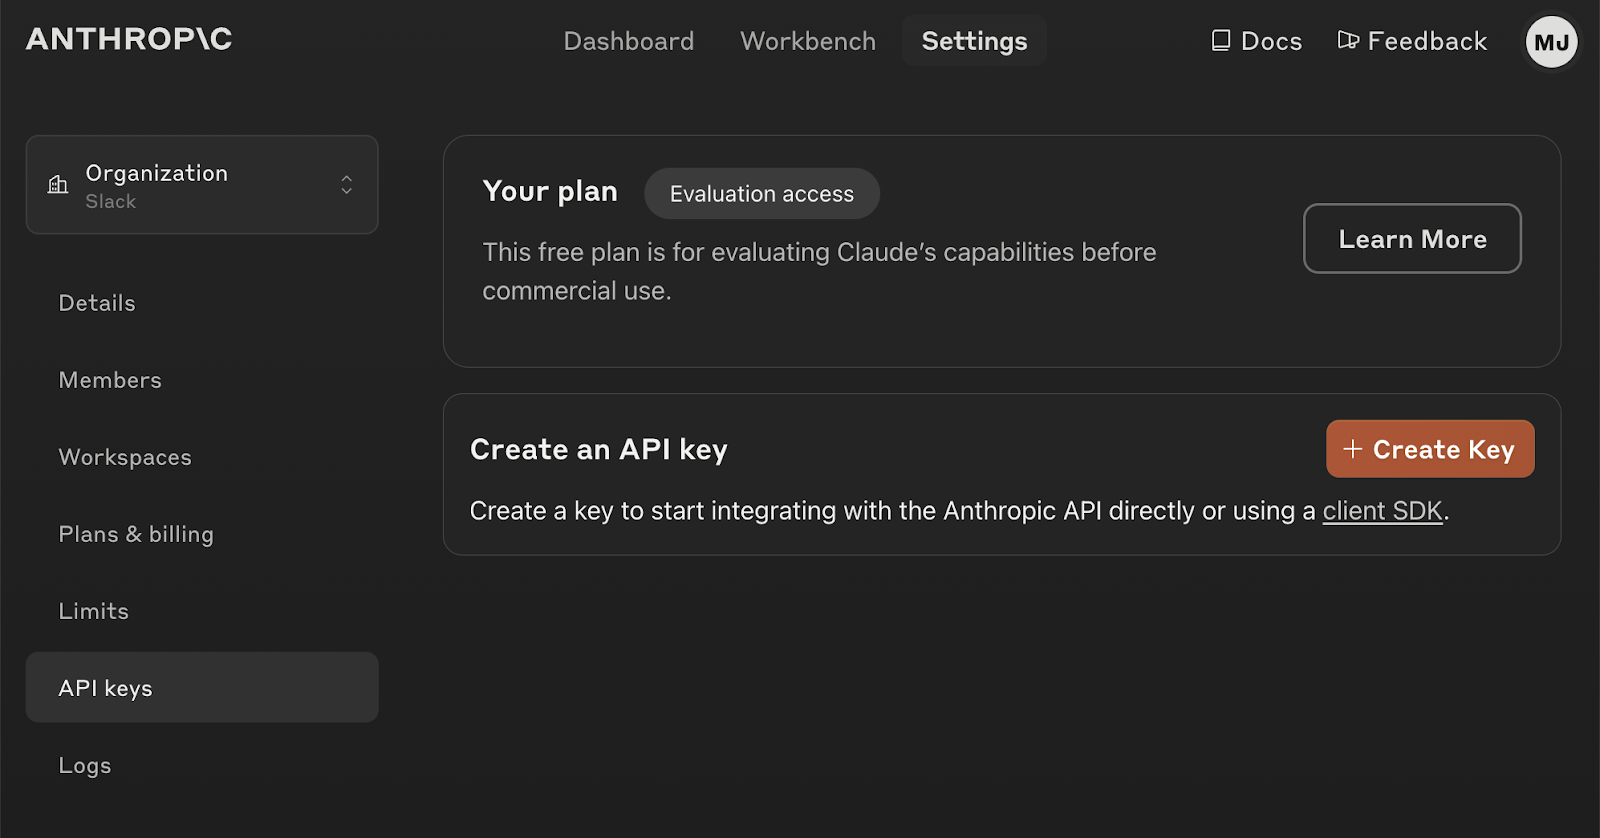
- Anthropic Claude
- Go to https://console.anthropic.com/login
- API Keys
- Click on + Create key
- OpenAI
- Configure Environment Variables:
Store your API key in a .env file for security:OPENAI_API_KEY=<your_API_key>orANTHROPIC_API_KEY=<your_API_key>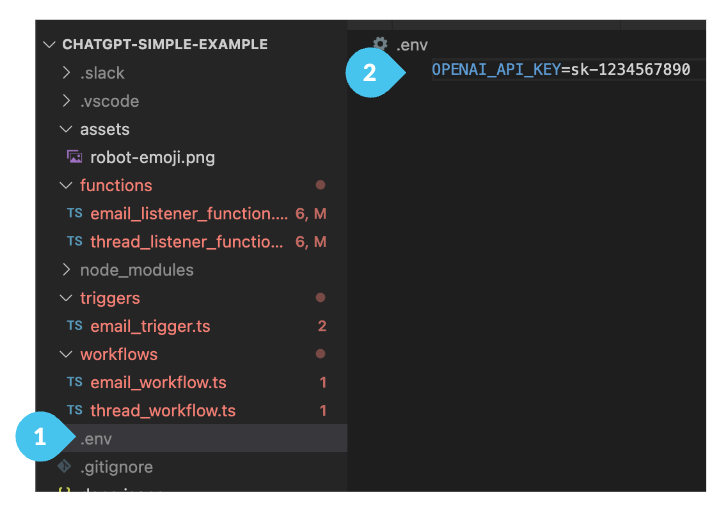
Step 3
Prepare your Slack channel
Slack allows you to forward emails into channels, and we’ll use this to simulate customer inquiries.
- Create a Slack channel:
In your testing workspace, create a new channel specifically for customer emails, e.g., #customer-support.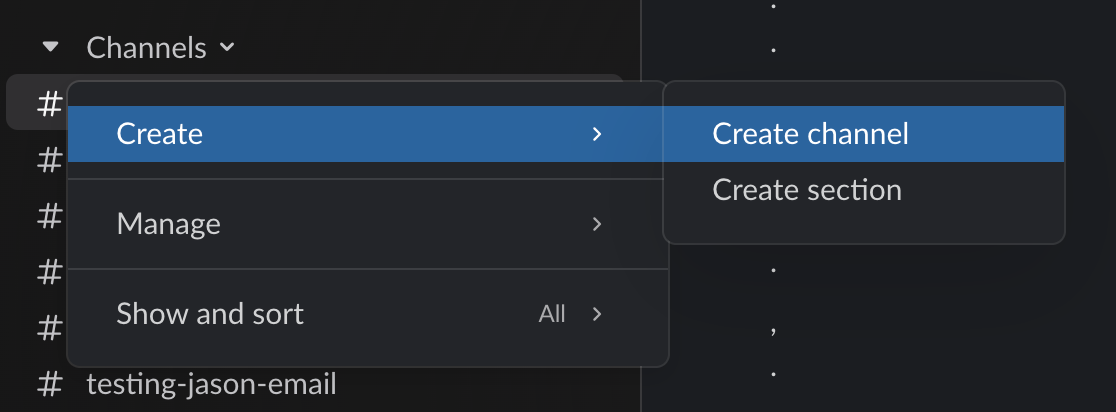
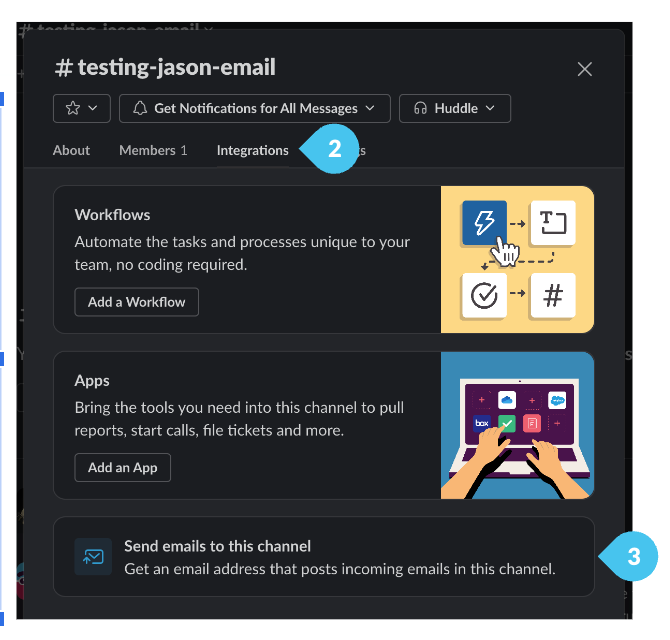
- Set up email forwarding:
- Click on your test channel name.
- Head to the Integrations tab.
- Click on Send emails to this channel and generate a new channel email. This is where we’ll forward customer inquiries to.
Step 4
Configure the event trigger
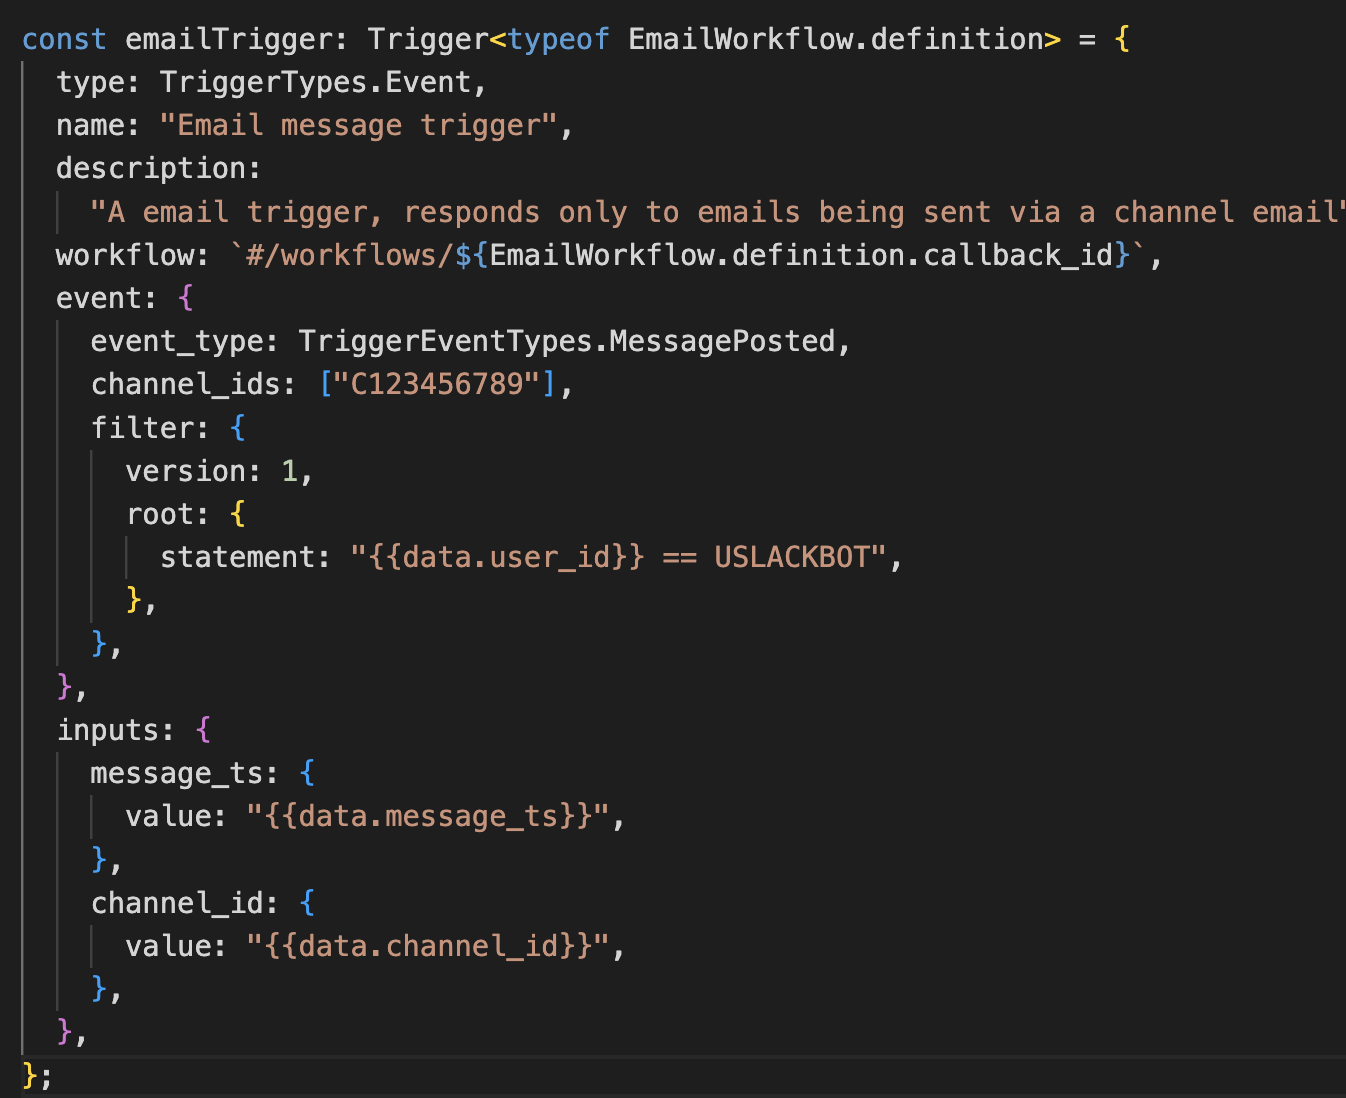
Let’s take a look at the email_trigger.ts file within the triggers folder.
Triggers come in a variety of forms in Slack workflows, such as message events, shortcuts, or scheduled events. For this use case, we’ll focus on an event trigger—specifically, a message event trigger. However, we don’t want every single message in the channel to trigger our workflow, as that would quickly become overwhelming. Instead, we’ll filter the trigger to respond only to messages from USLACKBOT.
Here’s what this means in practice:
- The trigger will activate only when a message is sent by USLACKBOT, ensuring that only email-based messages kick off the workflow.
- Inside the trigger event, we will extract some key inputs, including the message_ts (timestamp of the message) and channel_id. These values will be used in later steps when interacting with Slack messages (e.g., replying in a thread).
We’re going to set the channel that we want to listen on by setting the `channel_ids` parameter. Let’s follow the steps to get that channel ID.
- Right click on your test channel name in the sidebar.
- Scroll down on the About tab
- You’ll see your channel ID

- Paste this value in the channel_ids parameter within your email_trigger.ts file.
Step 5
Let’s explore Workflows
Once our trigger is tripped, it’ll set off a particular workflow into motion. Let’s take a look at that in the email_workflow.ts.

You will see that it’s a simple workflow, containing only one step, since the majority of the functionality is housed within the EmailListenerFunction.
Triggers can offer context that we can use in following steps of our workflow. Note that we are passing in those variables from trigger to the function (message_ts, channel_id).
Step 6
API methods and code tour
Let’s focus on the first function in email_listener_function.ts.
We’ll be using one of the most popular Slack Web API methods: sending a message to a Slack channel. To do this, we’ll utilize the client object available within the function definition. In this case, we’ll send a simple message to inform the user that our workflow has started, and we’re waiting for a response.
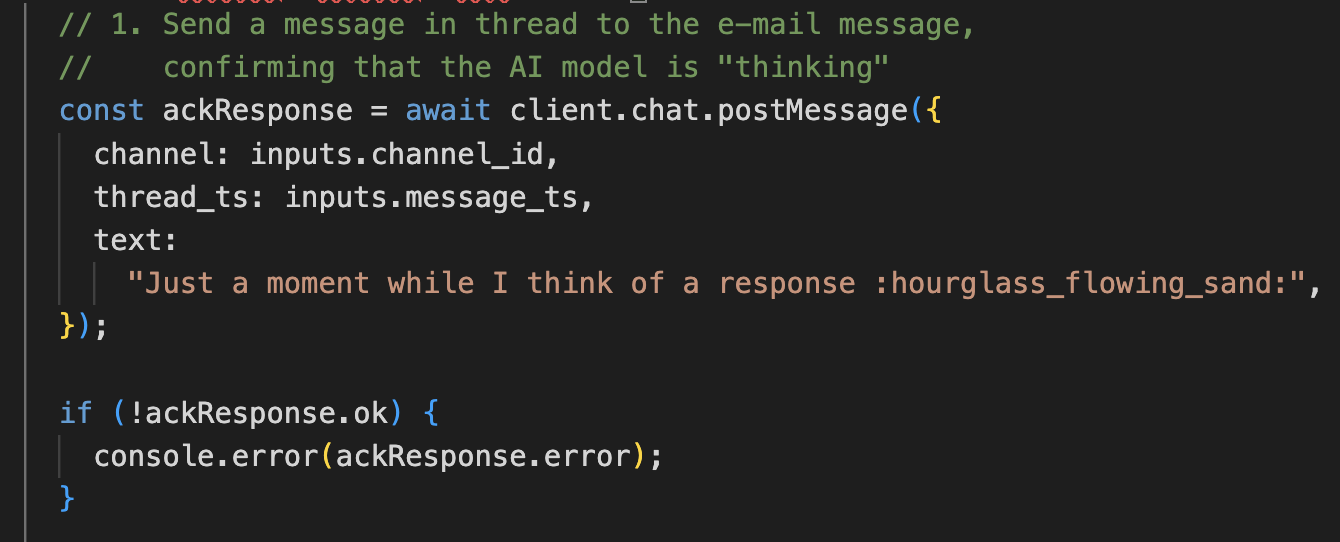
This sends a message letting the user know that something is happening while they wait. Now comes the exciting part: we’ll send the contents of the email to our AI model and wait for its response.
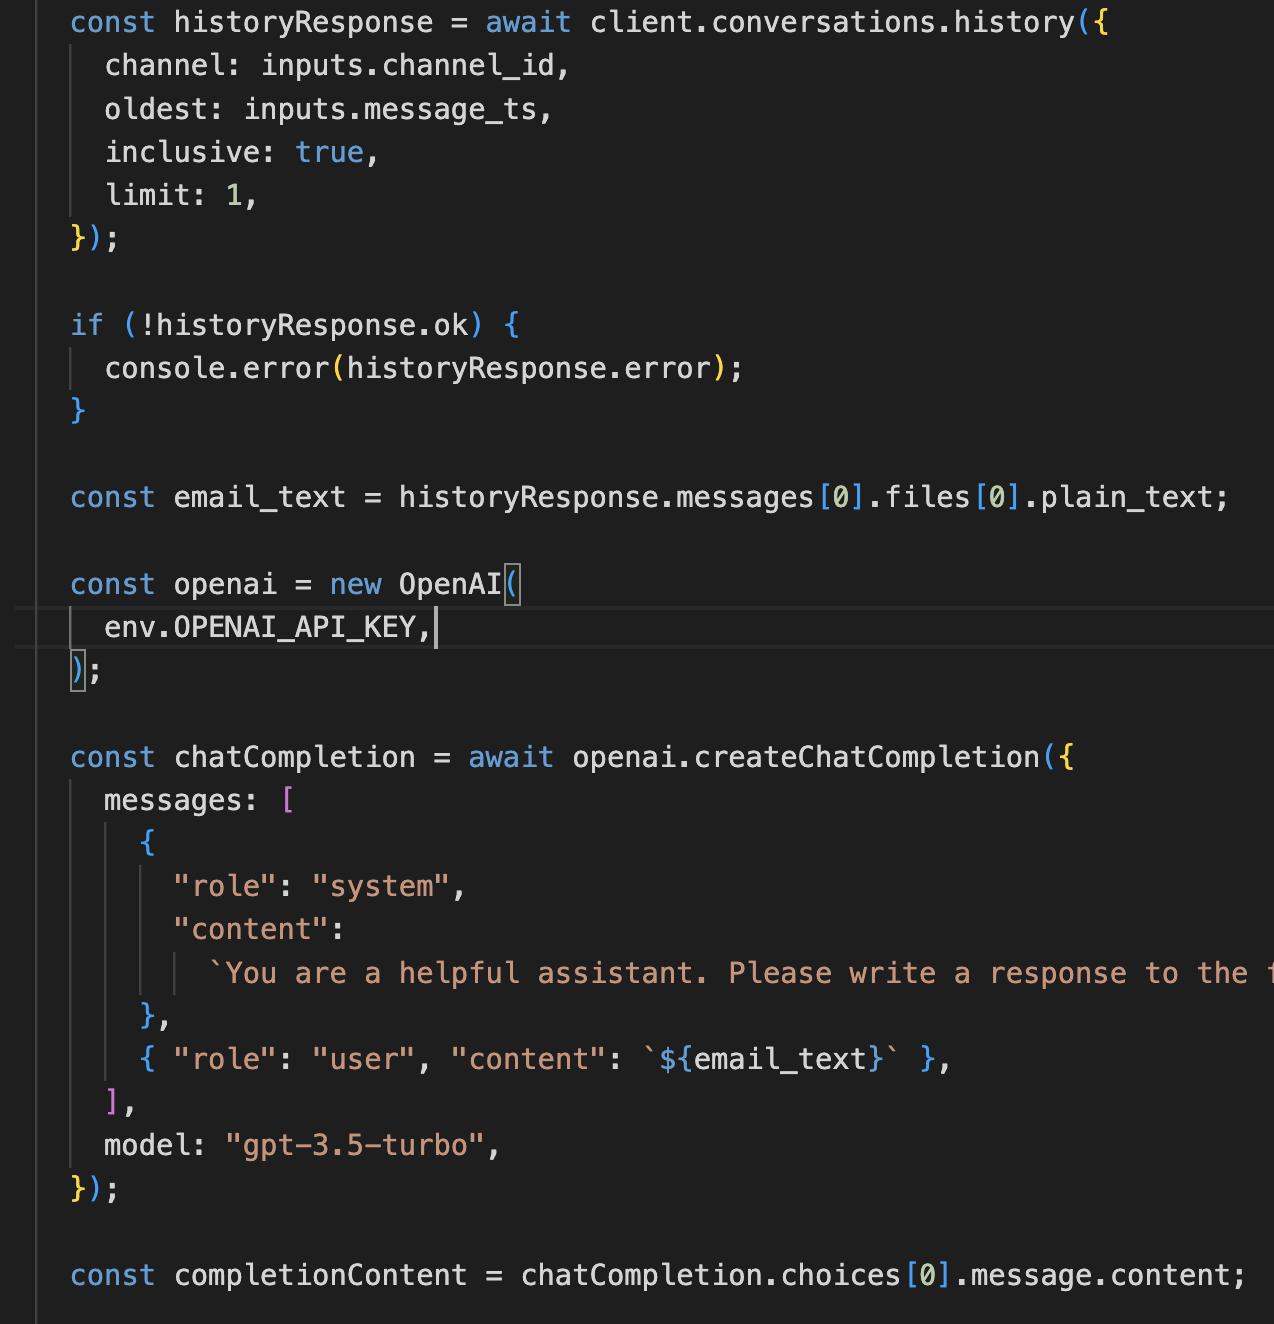
There are a few key steps to achieve this. Since the message event itself doesn’t contain file data (as that would be too large), we need to call the conversations.history method to retrieve the message and extract its content.
After getting the email content, we’ll send it to our AI model and follow the model’s method to process the information and retrieve the response.
Now, let’s post the AI’s response back to Slack so the user can see it! We’ll update the initial “thinking” message by using the chat.update method, ensuring we reference the same timestamp (ts) as the original message.
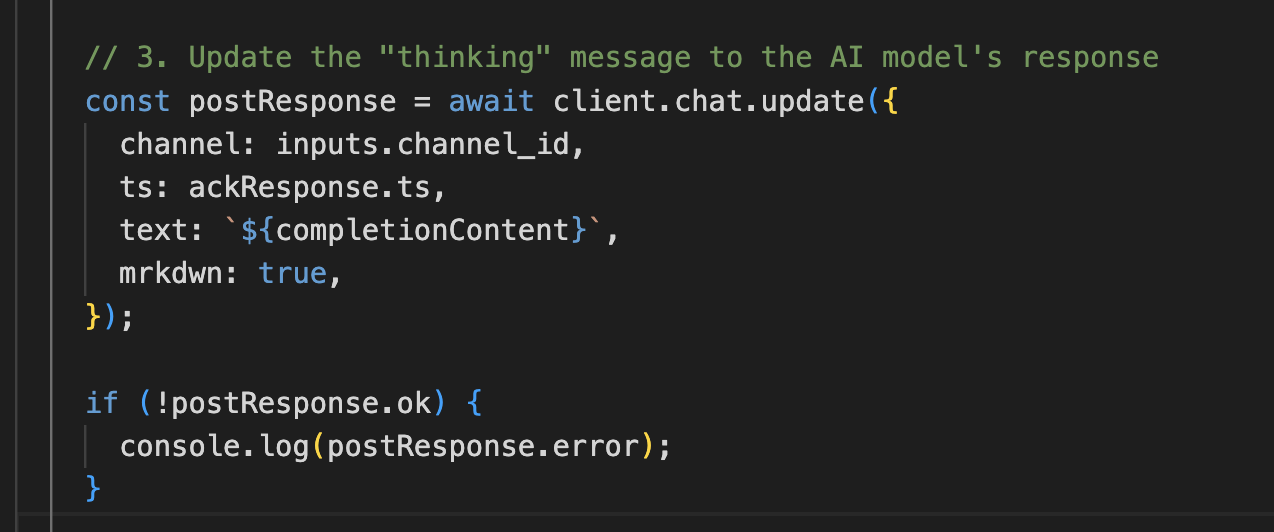
With that, we’ve completed the first part of our workflow!
Adding a Thread Listener
Next, we’ll set up a listener for replies in the message thread. While this isn’t strictly necessary, it helps make the app feel more cohesive.
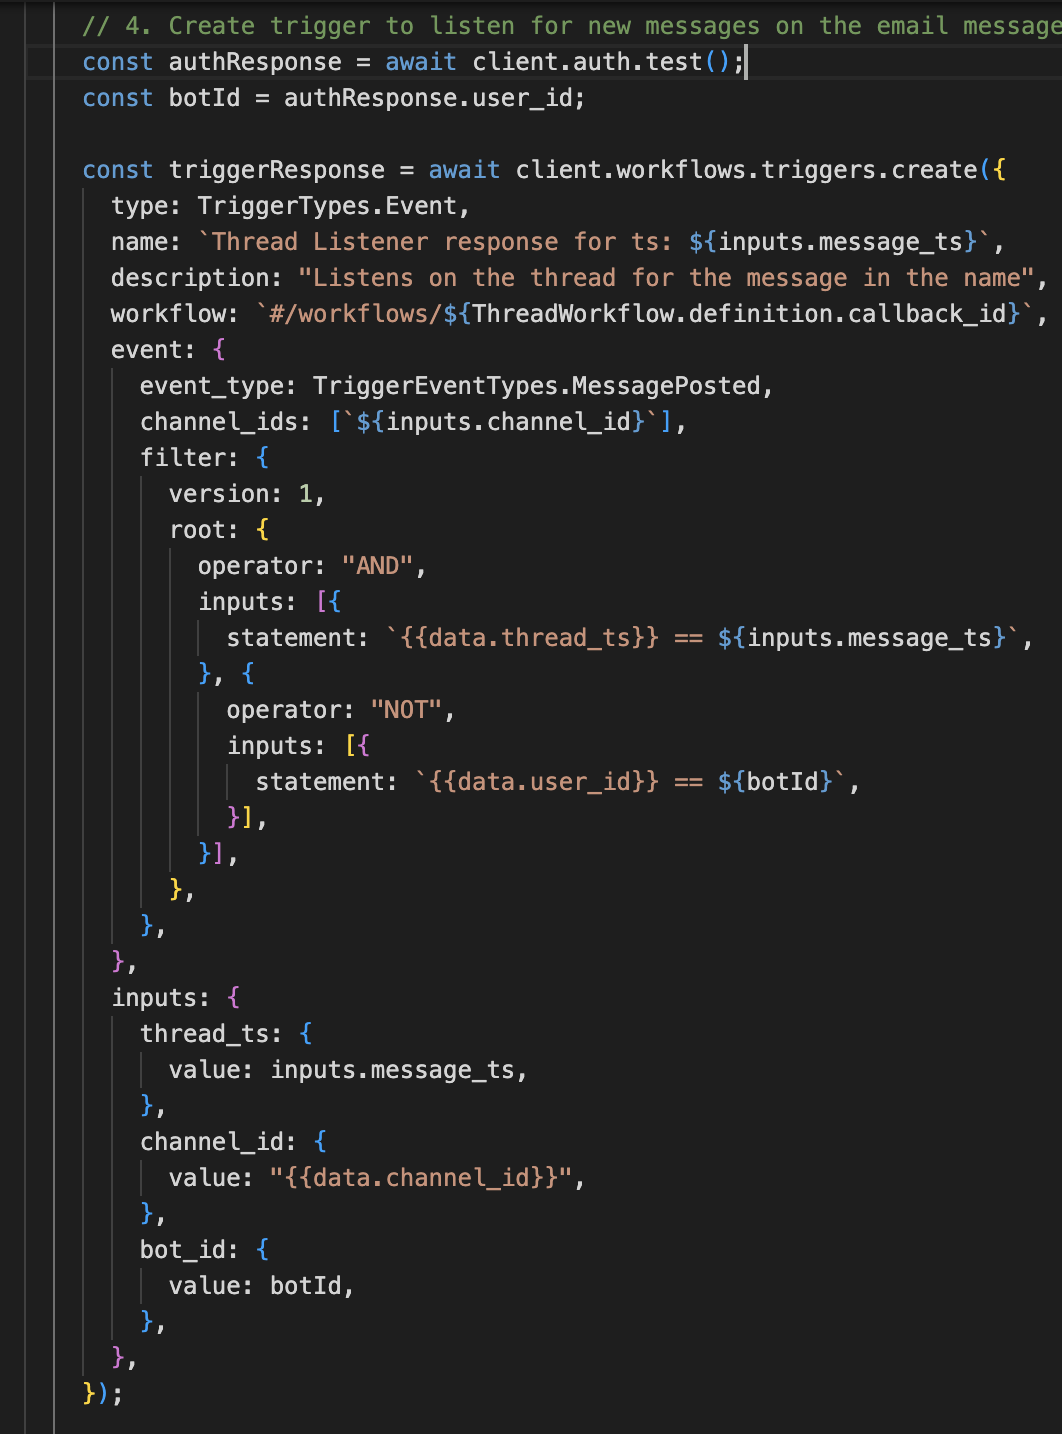
To achieve this, we’ll recreate the earlier logic but make it work specifically for listening to thread messages posted by users (not by the bot itself). To prevent the bot from triggering its own workflow and causing an endless loop, we’ll use the auth.test method to retrieve the bot’s user ID.
Using triggers.create, we can define all the necessary parameters, making sure to filter out the bot’s own messages and only trigger the workflow for user replies within the thread.
Finally, let’s take a look at the second function, thread_listener.ts. It’s similar to what we just covered, but the methods are adjusted to work with thread messages instead of channel messages. Can you spot the differences in the methods?
JavaScript

import { DefineFunction, Schema, SlackFunction } from "deno-slack-sdk/mod.ts";
import OpenAI from "openai/mod.ts";
import { ChatCompletionMessageParam } from "openai/resources/mod.ts";

export const ListenerDefinition = DefineFunction({
  callback_id: "listener_function",
  title: "listener text using AI",
  description:
    "A function that listens on a thread, pulls in the contents and uses AI to respond.",
  source_file: "functions/thread_listener_function.ts",
  input_parameters: {
    properties: {
      bot_id: {
        type: Schema.types.string,
        description: "User ID of the bot",
      },
      thread_ts: {
        type: Schema.types.string,
        description: "The thread timestamp",
      },
      channel_id: {
        type: Schema.types.string,
        description: "The channel Id",
      },
    },
    required: ["thread_ts", "channel_id", "bot_id"],
  },
});

export default SlackFunction(
  ListenerDefinition,
  async ({ client, inputs, env }) => {
    // 1. Acknowledge user input and response with "thinking" message
    const ackResponse = await client.chat.postMessage({
      channel: inputs.channel_id,
      thread_ts: inputs.thread_ts,
      text:
        "Just a moment while I think of a response :hourglass_flowing_sand:",
    });
    console.log(ackResponse);

    if (!ackResponse.ok) {
      console.error(ackResponse.error);
    }

    // 2. Get message contents by pulling in all conversations in the thread
    //    and feed contents to AI model
    const conversationResponse = await client.conversations.replies({
      channel: inputs.channel_id,
      ts: inputs.thread_ts,
    });

    if (!conversationResponse.ok) {
      console.error(conversationResponse.error);
    }

    const openai = new OpenAI({
      apiKey: env.OPENAI_API_KEY,
    });

    let messages: ChatCompletionMessageParam[] = [
      {
        "role": "system",
        "content": `You are a helpful assistant.`,
      },
    ];

    for (let i = 1; i < conversationResponse.messages.length; i++) { // Start at 1, the first message is the file
      if (conversationResponse.messages[i] != inputs.bot_id) {
        messages.push({
          "role": "user",
          "content": `${conversationResponse.messages[i].text}`,
        });
      } else {
        messages.push({
          "role": "assistant",
          "content": `${conversationResponse.messages[i].text}`,
        });
      }
    }

    const chatCompletion = await openai.chat.completions.create({
      messages: messages,
      model: "gpt-3.5-turbo",
    });

    // 3. Update "thinking" message with AI model contents
    const completionContent = chatCompletion.choices[0].message.content;

    const updateResponse = await client.chat.update({
      channel: inputs.channel_id,
      ts: ackResponse.ts,
      text: `${completionContent}`,
      mrkdwn: true,
    });

    if (!updateResponse.ok) {
      console.log(updateResponse.error);
    }

    return {
      outputs: {},
    };
  },
);Step 7
Run the app locally and test your workflow
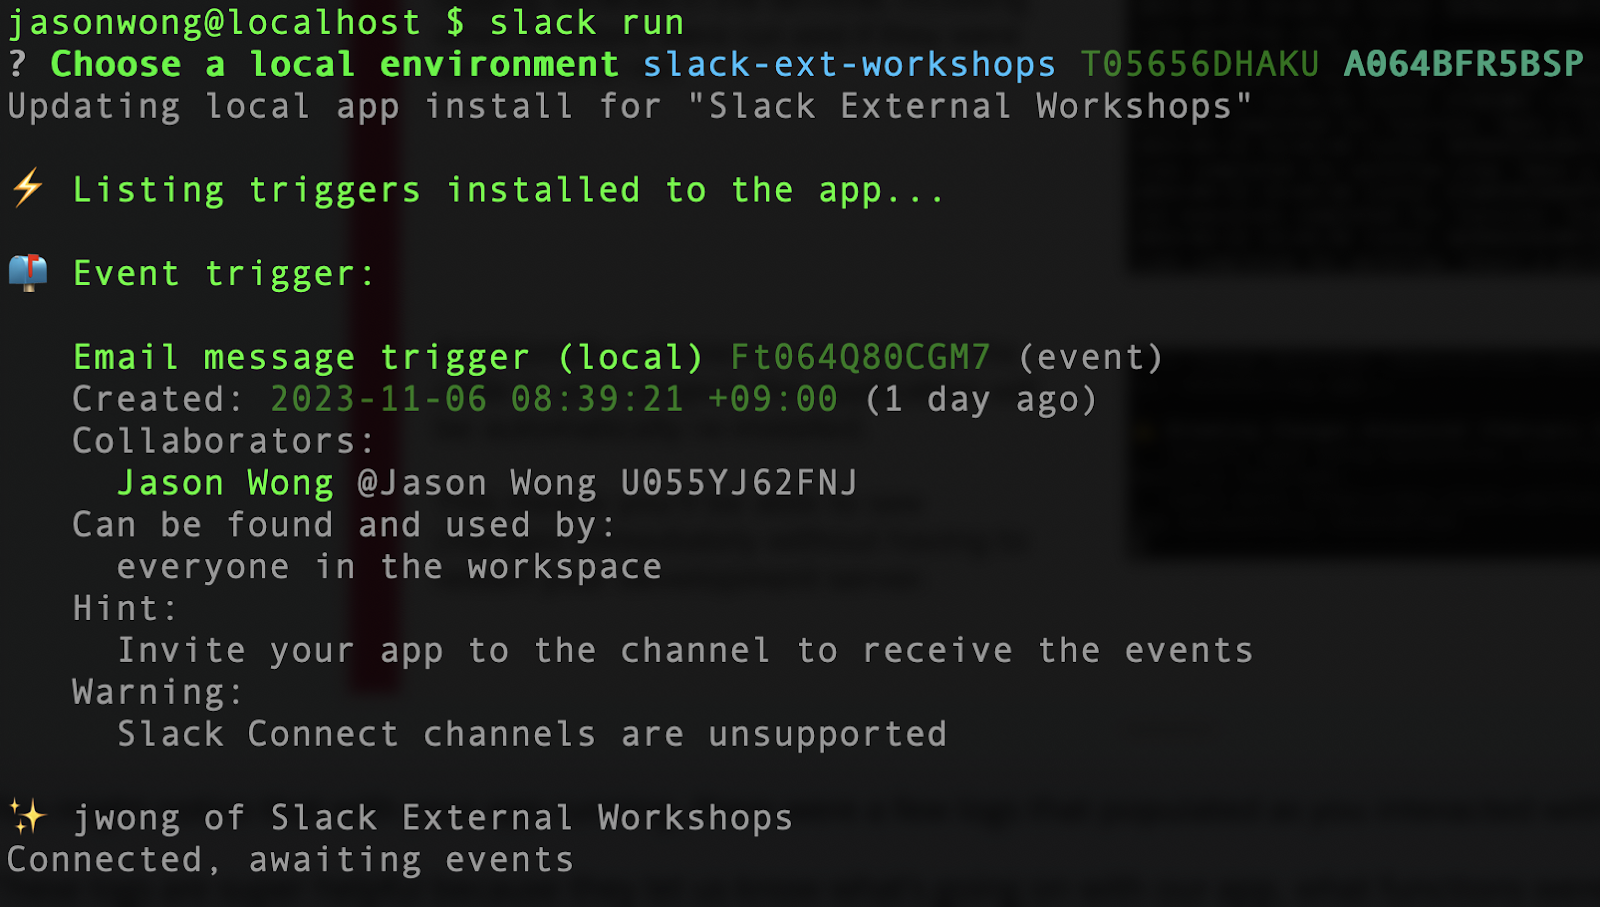
Let’s run the workflow locally using the slack run command. Once the app is up and running, important logs will appear, letting us know what’s happening with the app—such as which functions were executed and whether they succeeded.
A helpful feature of this setup is that whenever you update your project code, the app is automatically reinstalled and updated. This means you can see code changes reflected in your app immediately, without the need to restart any development server.
Next, invite your app to your channel. Your app cannot read events from a channel unless it’s actually in the channel, so let’s invite your bot to the testing channel. After that, test your setup by sending an email to the channel email address you created earlier (refer to step 3).

Step 8
Deploy and uninstall
If you want to use your app without needing to run it from your local machine, you’d need to deploy your app.
Run slack deploy. This will package your app, and make your functions available in Slack at any time.
Once your app is deployed, you can remove the local version. To uninstall, run slack delete in your project’s root directory. You’ll be prompted to choose whether you want to remove the local version or the deployed version.